Citrus Mexican Rice

Citrus Mexican Rice

Monday 22 July 2013

Citrus Mexican Rice

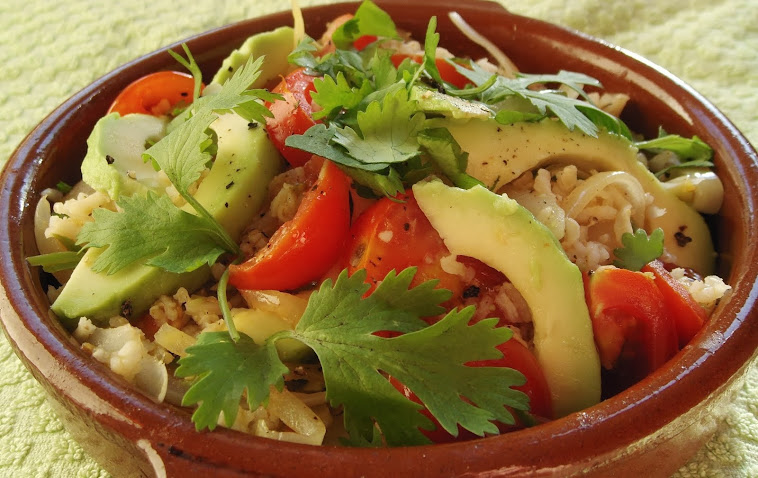
The classic combination of lime, fresh coriander (cilantro) and tomatoes conjures up memories of my time in Mexico, every beachside bar or cafe seems to have their own speciality based around these key ingredients. Often served as a side to fresh fish barbequed whole with the sun beating down and a tequila cocktail not too far away!
This can work equally well with or without the chicken, if making a vegetarian version I would suggest adding some stock to the cooking water with the rice to boost the flavour.
A great accompaniment to meat or fish also as a side to burritos or enchiladas.

Serves 2

100g brown rice
1 Chicken Breast (optional)
1 Onion (sliced)
1 Avocado (peeled and sliced)
A Few Cherry Tomatoes
Lime juice (either fresh or from a bottle)
A small bunch of Fresh Coriander (chopped)
1 Tbsp Rapeseed (Canola) Oil
Salt and Black Pepper

Put the rice on to cook by placing in a saucepan with enough water to cover and salt to taste. Brown rice can take up to 40 minutes to cook so do this before any preparation to save time.
Next slice the chicken breast into strips and fry on a moderate heat in a small amount of rapeseed oil to seal and give some colour and caramelised taste, remove from the pan and keep to one side.
Reduce the heat and scrape any caramelised residue off the base of the pan to prevent burning, sauté the sliced onion, you may need a little more oil at this stage . Keep the temperature low and allow the onion to sweat.

Meanwhile halve the tomatoes and peel and slice the avocado, dowse the avocado with the lime juice as soon as possible after removing the skin to prevent browning.
Chop the coriander, retain a few attractive leaves as a garnish but the remainder including the stalks can be chopped and used in the dish.

When the onion is translucent, return the chicken to the pan along with the tomatoes and stir to heat through.
Season to taste with salt and pepper and mix in the rice and the chopped coriander stalks.

At the last minute, add the avocado and stir through.

Garnish with the fresh coriander leaves and serve.


Tuesday 9 July 2013

Spicy Spanish Butter Beans

Spanish cuisine makes great use of beans in either their fresh or dried state and is often combined with tomatoes and either chilli or paprika. Here is a chilli version of a classic peasant tapas dish, any colour peppers can be added, as could sweetcorn, courgette, aubergine....experiment with whatever you have available. If you prefer a milder version just substitute the chilli for paprika. 
Most supermarkets now have tetra carton packs of tomatoes with onion, herbs, chilli and other combinations. I find these very useful and tasty; a real time saver not just with preparation but a far greater depth of flavour can be achieved in a fraction of the cooking time therefore saving money on fuel too.

Serves 2

1 Can Butter Beans, drained (or 100g dried beans soaked overnight)
1 Can Tomatoes
1 Fresh Chilli
 (or a tetra pack with chilli is very good)
1 Green pepper
1 Onion
1 tablespoon of Rapeseed Oil
Salt and pepper to taste

If using dried and soaked beans, a much longer cooking time will be needed.
Allow the beans to cook in the tomato on a low heat. Season and add a little boiling water too to prevent it drying out.
The beans may take up to an hour to become soft.

Start by sautéing the onion in the rapeseed oil on a low heat.
When translucent add the tomato and butter beans, (if the beans are dried follow the instructions above). Continue by adding the green pepper and chilli and allowing to simmer on a low heat for about 20 minutes.

Season with salt and pepper if needed and serve.


Makes a great addition to a selection of tapas or may accompany meat dishes or works equally well with rice and a fresh tomato salad.

Packed with protein and fibre, in combination with the antioxidants from the tomato and peppers this is a real super food!! 


Friday 5 July 2013

Tuna and Courgette Fettuccine

This is a super quick and tasty supper or lunchtime dish.
Fresh with citrus and chilli yet hearty and satisfying;

Serves 2

200g Fettuccine (dried)
1 small can of Tuna in oil
2 Courgettes (ribboned)
1 Can of plum tomatoes
1 Onion (chopped)
A few chilli flakes
A dash of lemon juice
1 tablespoon of Rapeseed Oil
Salt and Pepper to taste
Parmesan cheese to serve


Start by gently sautéing the onion in the rapeseed oil, on a low heat so that the onion doesn't brown. Then add the can of tomatoes, black pepper and the chilli flakes. Cook gently for 10 minutes or so.
While this cooks, ‘ribbon’ your courgettes.
This is best done with a potato peeler, lay the courgette flat and run the peeler down the length of the courgette to create a ribbon like piece. Repeat as much as possible, the remaining pieces can be finely chopped and added to the tomato sauce.

Speaking of the sauce, if you have a handheld blender then excellent, if however your equipment doesn't stretch that far then a potato masher will work fine. Mash the tomato sauce to achieve as smooth a consistency as possible. Return to the heat but keep it low.

For the pasta, bring a pan of salted water to the boil. With any pasta the most important thing to get right is to use a large enough pan of water. There must be enough room to allow the pasta to move around and for the strands to separate and cook evenly.
    So maybe that ought to read, bring a large pan of salted water to the boil.
When the water is boiling add the fettuccine, if it’s too long to fit in the pan, allow one end to soften and then gradually and gently push on the other end so that the pasta bends around the side of the pan. Once submerged, stir to separate the strands and allow it to return to the boil. Lower the heat slightly and simmer until ‘al dente’ or in other words cooked but not too soft and slimey. This will only take about 10-15 minutes.
The only sure fire way to get this right is to taste it periodically until it’s how you like it, with practice you will be better able to gauge it visually but until that time better to err on the side of caution.
While the pasta cooks, add the courgette ribbons and the drained tuna to the pan of tomato sauce along with a good dash of lemon juice. Just allow the courgette to wilt a little and the tuna to warm through, don't overdo it.

Drain the pasta and either swirl the sauce through and place in a serving dish or simply pile up straight on the plates.


Serve with a grating of parmesan cheese and a twist of black pepper.


Thursday 20 June 2013

Healthy Chocolate Cupcakes

 (with Beetroot and Cranberry)


This is a super delicious and indulgent tasting chocolate cup cake recipe but surprise, surprise....
       it’s actually quite healthy!! 
The inclusion of beetroot puree ensures an especially moist crumb to these cup cakes and the addition of cranberries gives an extra fruity note.
Beetroot boosts the fibre content, as does the cocoa and cranberries whilst adding antioxidants.  
If you are put off by the 'earthy' taste of beetroot, not to worry as this will be completely masked by the chocolatey cocoa taste!

Makes approximately 18 cakes,

200g self raising flour
250g granulated sugar
100g cocoa powder
75g margarine (room temperature)
250 ml milk
2 eggs (beaten)
250g beetroot (cooked and pureed)
50g dried cranberries
1 teaspoon Vanilla essence

If cooking beetroot from fresh, do not peel as all the colour will leach into the cooking water.  Merely scrub and boil whole, when cooked the skin will peel off very easily and all the beautiful colour will be retained.
Alternatively they can be bought whole and pre-cooked in vacuum packs.......however it is important to note, please do not be tempted to try the pickled variety! I cannot be held accountable for the results if you do.

Start by weighing and mixing all the dry ingredients together in a large bowl.
Put the cranberries to soak in the milk.
Then in a separate bowl combine the beetroot, softened margarine, vanilla essence and the beaten eggs. 
This will no doubt look particularly horrific, never fear....
                  the beetroot was already dead and feels no further pain!

Next, make a well in the centre of the dry mix and pour in all the wet ingredients, including the cranberries and milk, then mix together.
Spoon the mixture into paper or silicone cup cake cases and place on a baking tray.
Depending on the size of the cup-cake cases, this will make somewhere between 12 and 18 cakes. I used standard cases and managed 18 however the larger muffin type will yield fewer and the temperature may need lowering to 160˚C to ensure the centre cooks through.

Otherwise.....
Cook at 180˚C for approximately 20-25 minutes.
Skewer through to the centre to check it is cooked.

Cool on a wire rack, when cool store in an airtight tin 
           (or alternatively lock oneself away and scoff immediately with a large mug of tea!)


Friday 14 June 2013

Mumbai Mix-Up


Garam Masala is a dried blend of spices used in Indian cooking; it traditionally contains ground coriander, cumin, black pepper, cinnamon, black and green cardamom, bay leaves and cloves. Widely available and for myself, a store cupboard must have. It gives a curry flavour without heat, so is useful for adding a bit of depth to quick cook recipes.

Update the classic Bombay potatoes with a mixture of whatever vegetables you fancy or have lurking in the fridge drawer.
This serves around 2 ish but is so delicious you may eat it all to yourself! 
So be on your guard!

For this version I used;

1 red onion (sliced thinly)
1 green pepper (sliced thinly)
4 small carrots (chunky slices)
4 or 5 new potatoes (halved)
1 small head cauliflower (broken into florets)
100g green beans (whole)
4 Birds Eye chillies (whole, careful these can be very hot!)
1 or 2 teaspoons of Garam Masala
1 or 2 teaspoons of curry powder (very much down to individual taste)
Rapeseed oil for frying
Salt

Start by scrubbing the carrots and potatoes, wash the other veg and separate the cauliflower into florets.
I’m not much into kitchen gadgets but there are a couple of bits of kit that since I got them I really wouldn't want to live without, one of these is my steamer pan.
I more or less use mine every day and think it a very wise investment if you have any cash to splash.
The other ‘can't live without/ how did I manage before’ item, in case you were wondering, is my hand-held blender.......so useful for soups, sauces, purees, chopping super finely (it has an attachment!) .........I realise I'm going a bit kitchen geek here and so shall stop and get back to the point.

So, we have carrots and potatoes (in together in the same tier if they fit) in the steamer ready to go. If you don't have a steamer, they can be microwaved or boiled (just don't overdo it, they need to be firm but cooked).
Put the steamer on the heat and bring to the boil. when boiling, reduce the heat slightly but high enough to maintain the steam. Also the cauliflower can go in the second tier of the steamer after a couple of minutes and right at the end, throw in the green beans for a quick blast.

In a large based pan, a deep frying pan is perfect, put the oil on a low heat. When warm add the sliced onion, the idea is to sweat the onion off and release all the natural sugars whilst evaporating all the water. This requires a little bit of patience, so keep the heat low for now while the magic happens.
Once the onion is translucent and looking nice and glossy, turn the heat up to moderate and add the green pepper, chillies, curry powder, Garam Masala and salt. Don't let anything stick so keep it moving around the pan, you're looking for some caramelisation of the onion but not all out burnt!

About now the steamed veg should be done, so check that and take off the heat.
Add the green beans to the onion mixture and cook through for about 3 or 4 minutes.
Continue by adding the rest of the steamed vegetables and turn over to coat with the curry spices
Great just like this or serve with rice or as part of a larger, full on Indian feast!


Tuesday 11 June 2013

Green Vegetable Salad with Mint Butter

Peas.....they are just a wonder food! Vibrant, fresh and full of protein.
Just as good for you when coming out of a freezer bag too, but oh so much more convenient!

This makes a great accompaniment for a barbeque.
Also works very well with roast chicken, pork chops and fish or as a dish in its own right.

Serves 4

200g Green beans (fresh or frozen)
200g Peas (fresh or frozen)
1 Onion (thinly sliced)
1 or 2 potatoes (peeled and boiled)
A few sprigs of Fresh mint (or dried will work at a push)
A large pat of butter (approx 25g/30g)
1 Lemon (for juice)
Salt and Pepper to taste

If using fresh peas and beans, start by blanching them.
Wash and trim the beans, shell the peas.
Put a large pan of water on to heat. When it is at a rolling boil add the vegetables. You may have to do this in batches if the pan is on the smaller side. Bring the water and vegetables back to the boil and cook for a minute or two, not any longer than this. Then drain the vegetables into a colander and plunge into cold water to stop the cooking process.
(If using frozen, skip this stage but do allow to defrost.)

While they are cooling off, melt the butter on a low heat in a shallow pan.
If using dried mint, add it to the melted butter along with black pepper and a little salt to taste. Throw in the sliced onion and fry off for a minute or two.
If its fresh mint you have, add it now and stir through. Turn the heat very low or even off completely if you have a well fitting pan lid.
Add the other vegetables, peas, beans and potato along with a good squirt of lemon juice. Give it a good turning over to mix together and put the lid on to retain heat.
Serve on warm plates.

If you are particularly organised and keen, you can make herb butters very easily and they can be frozen in small pats for later use.
Simply finely chop the herb in question or crush with a pestle and mortar.
Then work through some butter with the back of a spoon.

Press into small containers, ice cube trays are about the right size and either keep in the fridge for a day or two or freeze for later.

Friday 7 June 2013

Stir Fry Chilli Noodles

I find a Stir- fry is a great staple dish as it can be adapted to whatever is to hand.
For the chilli noodles I used the following;

To serve 2

1 or 2 packets of straight to wok noodles (this is very much down to individual preference, I can usually eat a full 150g pack to myself but then again I’m not noted for my lack of appetite!)
3 or 4 spring onions (chopped finely)
2 or 3 cloves of garlic (crushed/sliced)
1 head of bok choi (roughly chopped or just separate the leaves)
1 red pepper (thinly sliced)
A handful of fresh mushrooms (sliced)
or you can get dried or tins of exotic mixed mushrooms which work very well
1 fresh chilli pepper (chopped finely)
Soy sauce to taste (reduced salt if possible)
Small amount of oil for frying (rapeseed is great)
A squirt of tomato puree works well too, if you fancy a richer sauce

The key to a successful stir-fry is to prepare as much as possible before starting to cook. Once the heat is on, time is crucial to avoid over cooking all those beautiful vegetables and losing not only the vivid colours but more importantly all that vitamin C and folate.
So with this in mind have all the chopping and shredding done before putting the pan on the heat.
It’s also a good idea to boil the kettle beforehand ready to rinse off the noodles to soften them.
Whilst on the subject of pans, a specific Wok pan isn’t necessarily important however a large enough base to the pan is. If you don’t happen to possess a Wok, a deep sided, large frying pan is perfect. If you only have saucepans, just make sure it’s got a large enough base to get the heat evenly to all the ingredients.
So, everything is chopped and ready. Put the oil in the pan on a fairly high heat. Allow to heat through and throw in the spring onions and garlic, stir quickly to avoid sticking and browning. If this happens, reduce the heat slightly. You must act quickly so keep your eye on it!
Cook through and add the rest of the veg.
Keep stirring!
After about 5 minutes, place the noodles in a colander or sieve and pour over hot water to loosen them up. Then add these to the veg pan, stir through and add soy sauce to taste.

Ready ......steady...... EAT!